Screenshot Beautifier — add a beautiful background to any screenshot
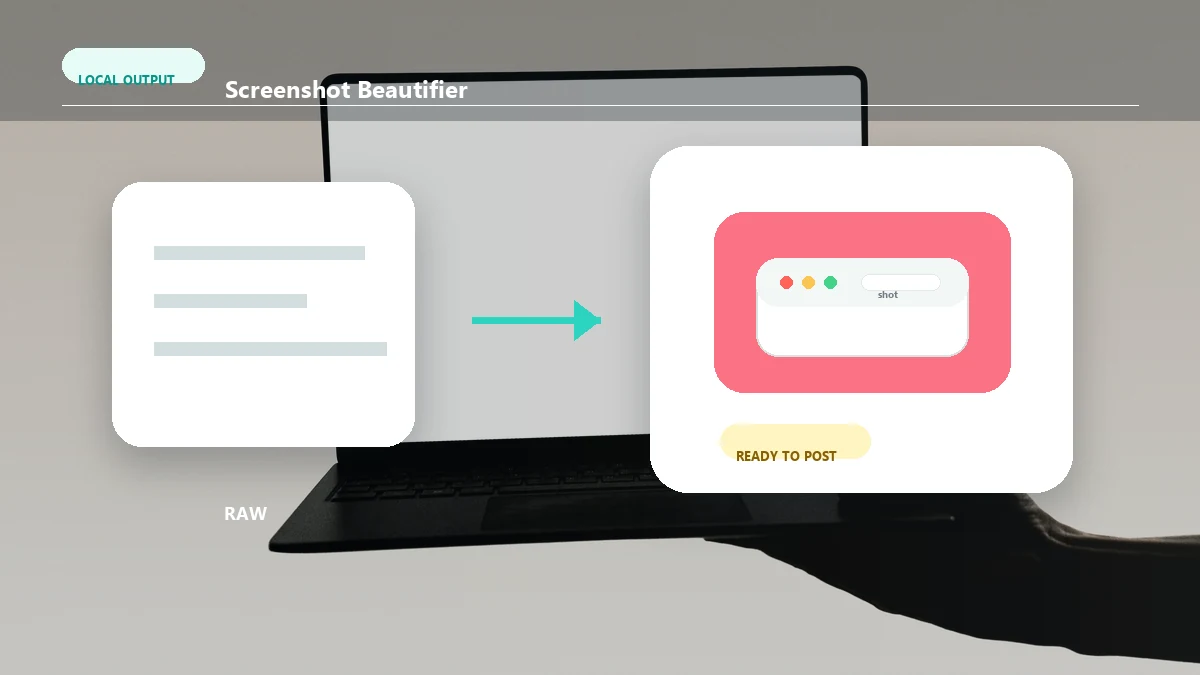
A screenshot beautifier places your plain screenshot on a beautiful gradient or mesh background, then adds padding, rounded corners and a soft drop shadow — with an optional mac traffic-light window or a browser bar with a URL. In a couple of clicks a raw screen grab becomes a polished image you can post on X, drop in a doc, or use on a landing page. Shape Cat exports a crisp 2x PNG (or copies straight to your clipboard) with social-ready ratios (1:1, 16:9, Twitter, OG and more) — all composited locally in your browser, nothing uploaded.
Screenshot Beautifier is a free online tool from Shape Cat that runs entirely in your browser - open it, do it, and download the result. Nothing is uploaded, there's no sign-up and no limits.
Drop an image, or click to choose
Stays in your browser
Tip: paste a screenshot with Ctrl/⌘+V
Why does a beautified screenshot beat the raw one?
A screenshot taken straight off your display has hard square edges and a plain-white or cluttered-desktop background — dropped into a tweet, a doc or a landing page it looks abrupt and cheap. A screenshot beautifier fixes this with a few small but decisive moves: a ring of padding so the image can breathe, rounded corners, a coordinated gradient or soft mesh background behind it, and a gentle drop shadow that lifts the screenshot off that background. Together they take the same capture from 'quick note' to 'made on purpose' — which is exactly why ray.so, shots.so and Screely caught on. Sharing screenshots is a daily act for developers, marketers, support and founders, and making them look good is a common little pain. Shape Cat does it as a pure in-browser tool: open and go, nothing uploaded.
Window chrome is the detail that gives a screenshot context. Wrap a web screenshot in a browser bar with a URL and a reader instantly knows it's a website; put the familiar mac red-yellow-green traffic-light dots on a code or terminal shot and it reads as 'this ran on a Mac' with that polished feel. Shape Cat draws all window frames in code with no image assets, so however large your screenshot is or however many times you scale the export, the frame stays razor-sharp and vector-crisp. For backgrounds, rather than dumping dozens of gaudy options, we curate a small set of genuinely good gradients, soft meshes and solids — few and refined, so a quick pick never goes wrong.
Choosing the right export ratio saves you a crop before posting. For a Twitter / X image, a 16:9 landscape shows fullest in the feed; for an article's or site's og:image share card, 1.91:1 is the ratio platforms grab; Instagram and similar prefer a 1:1 or 4:5 square. Shape Cat ships these social presets, centers the screenshot and fills the sides naturally with the background, so the export is already the size you need. Finally, exports render at 2x pixel density (that '2x' crispness) by default, staying sharp on high-DPI screens and when zoomed; or copy straight to the clipboard and paste right into a tweet, Slack or a doc — skipping the download-then-reupload step entirely. All local, nothing uploaded, no sign-up, no limits.
Screenshot beautifiers compared: Shape Cat vs ray.so vs shots.so vs Screely
These all add a background, padding, rounded corners, a shadow and a window frame to a screenshot. The table below lists only verifiable facts (as of June 2026, per each tool's own site); a one-line 'which should I use' follows.
| Tool | Free | No login | Local (screenshot not uploaded) | Export |
|---|---|---|---|---|
| Shape Cat Screenshot Beautifier | Yes | Yes | Yes (canvas, in-browser) | PNG (2x) / copy to clipboard |
| ray.so | Yes | Yes | Not stated | PNG / SVG / copy |
| shots.so | Free for basic use, no watermark | Not needed for basic use (login saves projects) | Not stated | PNG / WebP / JPEG / GIF / video |
| Screely | Yes | Yes | Yes (site states 100% local) | PNG |
'Not stated' means that tool's site doesn't explicitly claim it, so we don't assert it for them; shots.so's multi-frame / animated features sit behind its plans.
Which should you use?
- You want to render code into a code image (not dress up a bitmap): use ray.so, or our Code to Image tool.
- You want GIF / video, multi-frame or App Store size sets: use shots.so's advanced features.
- You care that the screenshot is never uploaded, and want bilingual + 2x ready to post: use Shape Cat or Screely — both are local; Shape Cat adds Twitter / OG social ratios and copy-to-clipboard.
How to use screenshot beautifier
- 1Drop in or paste a screenshot (code, a chat, an error, a dashboard — anything).
- 2Pick a background: a tuned gradient, a soft mesh, or a solid color.
- 3Drag the sliders for padding and corner radius; toggle the shadow and dial its strength.
- 4Optionally add a window frame: mac traffic-light dots, or a browser bar with a URL.
- 5Choose an export ratio (auto / 1:1 / 16:9 / Twitter / OG…), then hit Download 2x PNG or Copy to clipboard.
Why use Shape Cat's Screenshot Beautifier?
- An asset an AI can't hand you: a chatbot can describe a layout, but it can't return the finished image of your actual screen. Here the output is the picture itself.
- Local compositing: your screenshot is never uploaded, and it often holds code, chats and internal data that should never leave your machine.
- Crisp export: renders at 2x pixel density by default, so it stays sharp in tweets, docs and covers.
- Post-ready: built-in Twitter 16:9 and OG 1.91:1 ratios mean the export is already the size the platform wants.
Frequently asked questions
How is this different from the mockup generator?
The mockup generator focuses on placing a product screenshot inside a fixed browser / phone device frame for a showcase shot. The screenshot beautifier is lighter and more general — it's about giving any screenshot a beautiful background, padding, rounded corners and a shadow, then picking a social ratio and exporting in one go, great for everyday posting on X or in docs. Use the mockup generator for a device frame, the beautifier to quickly make a raw screenshot look good.
Is the export sharp, or will it look blurry?
Sharp. The export renders at 2x pixel density (2x) by default — the clarity you'd see on a high-DPI screen — so it stays crisp in tweets, docs and zoomed-in covers. The one limit is your source: blowing a tiny screenshot up huge is still bound by the original resolution, as with any tool.
Are my screenshots uploaded to a server?
No. All compositing happens locally in your browser with canvas; the screenshot never leaves your device. That matters most for screenshots, which often contain code, chat logs, dashboards and error messages you shouldn't hand to an unknown server.
Can I copy it to the clipboard and paste it into a tweet?
Yes. Hit Copy to clipboard to grab the finished image and paste it straight into Twitter / X, Slack, Notion or anywhere that accepts pasted images — no download-then-reupload. (Writing images to the clipboard works in modern Chrome / Edge / Safari.)
How does it compare to ray.so / shots.so?
All three share the same idea: add a background, padding, rounded corners, a shadow and a window frame to a screenshot. ray.so leans toward turning code into pretty code images; shots.so has more options. Shape Cat is lighter, bilingual, pure in-browser with nothing uploaded, ships a curated (not overwhelming) set of backgrounds, and includes Twitter / OG social ratios plus 2x crisp export — for quickly making one screenshot look good and shipping it, Shape Cat is the smoother pick.
Updated · shape cat team
Sources, review and limits
Last verified
2026-06-17
Author
Shape Cat editorial desk
Reviewer
Brand asset review
Primary sources
- Browser Canvas and SVG export APIs
- Color and typography heuristics maintained in the site tools
- User-entered brand names, colors and prompts
Brand kits are creative starting points, not trademark, accessibility or brand-strategy advice. Test contrast, licensing and legal clearance before launch.